This is a 8x10 digital collage I made using a computer program called Photoshop. This makes the PERFECT gift for any animal lover, and especially perfect when you use your loved one's pet. You can make your own collage with a few photos gathered from around the internet, a photo of your pet, and the computer program 'Adobe Photoshop'. Read on to learn how I made mine.
Sizing your photos...
The photos should be as large as you can get them. For this tutorial we want the final image to be 8"x10", and 200 dpi. 300dpi would be even better, but I am using cabinet cards which usually come in smaller sizes, so this is as large I could get the images without things getting blurry and pixelated. Any thing 150dpi should be just fine for printing out at home. You will re-size your images in Photoshop. The command is in the top menu under "Image/Image Size".
In most cases when you get images from the internet the dpi will be 72. Hopefully though the image will be 20" so we can raise the dpi and at the same time shrink the image without ruining the print quality. To look for large photos try searching 'Google Images' and selecting advanced search options for only 'large' images.
Here is the photo of the cat I used. You will want a photo that has the animal's face straight on.
Try not to cut off it's whiskers or ear hair.
Your Pet's Face : Making a New Layer
Open your cat's photo in Photoshop. In the 'Layers' Window, go to the little arrow at the top of the panel and select "New Layer". A new blank layer will be created. Drag this layer to the bottom of the list. If the layer with the cat's face on it is locked (you will see a tiny padlock icon), then click on this layer and select "duplicate layer". A double of this layer will be made, and you can drag this one around and delete the other one using the little trash can icon at the bottom of the panel.
Your Pet's Face: Cutting out the Photo
Select the layer the head is on. Using the 'Polygonal Lasso Tool' from the left side menu bar, trace the outline of the head.
You can work by sections and this part takes a long time to do (maybe 30 mins - an hour +). But be sure to take your time and zoom in close. You want to select the background, not the cat, and then press the "delete" button each time. We are deleting the background around the cat's head. You will see and checker board pattern appear, that is the other blank layer showing through. save your work occasionally.
If you make a mistake, you can "undo" your last action under 'edit', or using the 'History" window.
Your final image will look like this. To preserve the transparent layer save the head as a psd file, or if wanting to use for the internet only, as a gif.
Your Pet's Face: Recoloring the Photo
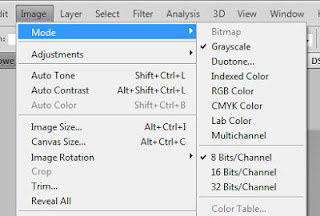
Once your head is cut out you can recolor it into sepia tones. I like to save this new image under a different name. Save your working files as 'psd' to preserve your layers. If you save as a 'jpg' you will loose your work. To change the color I will fist change my image to 'Grayscale'.

Go to the top menu and select "Image/Mode/Grayscale". It will ask if you want to merge your layers. Select No. Your image is now grayscale. Now we are going to recolor it. So go back and select "Image/Mode/RGB". We can now work with color again.
Next step... adding new color. Open your sepia tone body image in Photoshop. make sure full screen is not on. We want to go back and forth between the photos. Now go your cat photo and go to your layers window. Create a "new layer" on top of the face layer. Using the 'eyedropper tool' from the left side menu, choose the light tan from the body photo.
Then going back to your head photo, select the new top layer. go to the left side menu and select the "paint bucket tool" and fill in the entire layer.
You should now be looking at a page completely in tan. Here is the interesting part. Go to the layer window, and look at the top of it. There if a drop down menu on the left side. it has the word 'normal'.
If you hit the arrow you will see a large list of words. Select each one and play around with this. You will see that the color screen will interact with you head and each one will change the image in different ways. We want to select the word "color". The image now looks pretty good. Maybe it is a bit too tan now. Kinda looks like it might need a bit of that dark brownish color in there too. So you can make a 'new layer' on top of the other one, and paint it in with a brown color. Use the 'eye dropper' on the body image to pick the right shade. This time instead of selecting "color" try out "soft light". Now that looks pretty good!
But the background of the image is not see though anymore. It's a brown color. So we will have to delete it. don't worry, this time it is way faster. On the head layer, go to the left menu, and select."magic wand tool", no click the background. You will see it selects everything in one click. Hit delete. Nothing happened. what? Oh we are one the wrong layer. Select either top layer in the 'layer window', now hit delete. Sweet. It deleted this time! Now the other top layer, delete. Awesome! Save now.
To bring the head into the image with the body, you have to 'select all'. This is a command located on the top menu bar under "Select/All". So now we are going to copy the image. Go to the top menu and select "Edit/copy merge".
Why not just copy? why copy merge? If you select copy, it will only copy the image on the layer you are selecting, not all the layers. We want all of them.
So after selecting 'copy merge', we can jump on over and 'paste' into the other image. If you are using my provided images, the head will be the perfect size. Sweet. If you are using your own image, the head maybe be too big or too small. To re-size it, go to "Edit/Free Transform".
You will now be able to move it around and resize it, also you can make it fatter and skinnier We don't want to warp it, so before you even start to move it around. Hold down the 'shift' button on your keyboard. That will keep it from getting all weird shaped.When you are happy with it's size, you simply click onto the left menu. Anywhere. and it will ask you if you are happy with how it looks. If you are click 'accept/confirm', if not click 'cancel' and try again. I you want to add little bows of flowers and jewlery, crowns, hats, whatever, to the image, the process the exactly the same. I have added 2 images I made up already. If you stand back and look at your work and think that the head color is just a touch off. You can quickly adjust this. On the top menu go to "Image/Adjustments/HueSaturation".
In this window there are 3 rows with arrows. You can slide the arrows around to change the colors and intensity of the color. Make sure the correct layer is selected.
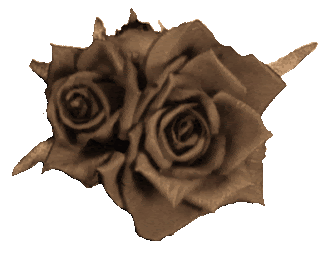
Here are some additional do-dabs to add to your image.
Feel free to use anything you see here for your collages, but please be kind and do not sell these images. There are bazillions of free images you can grab online. Most images, art and photography is public domain 50 years after the death of the artist. Anything Victorian era, like cabinet cards, are completely free to use. Try looking around on 'Google Images' using the advanced search settings under size/large, and choose the color brown. You can find usable vintage images in about 2 seconds. Another great place is on Etsy as people sell cabinet cards and often post large images of the cards to sell them. These are often large enough for digital collages. You can also buy digital collage and scrap-booking sheets for a few dollars on etsy.com if searching the internet for images is tedious to you.


